

Everything today is made by machines - cold, impersonal, identical. Fifteen thousand other people are wearing the exact same shirt that you just bought from the Gap. Think about it: you'd probably be a lot happier if everything you owned were handmade specifically for you. If we don't fight this mechanization of society, humans will eventually become slaves to machines (although that is what keeps this site in business…)
With visions of apocalyptic terror now running through your head, you can ease your pain by learning how to make a personal, homemade quilt. The art of quilting has seen a resurgence in recent years, and making a quilt not only allows you to participate in artistry, but also gives you a comfy warm blanket as an end result.
Quilting is not that tough. Those pioneer women did it in the 1800s, and they didn't even have electricity. So hold on to your saddles, buckaroos, and (in bad Western accent), "let's larn us some quiltin'."
A note: Look, we're realistic. It would be impossible to teach you how to quilt through just one article. It takes practice, trial-and-error, and many people take classes. But after reading this SYW, you'll at least understand the process. So please, save the angry letters. In fact, make a quilt with them!
But if you are in a hurry to join that knitting circle of friends, skip the tutorial and take a look at this quilting video. It will have you on pins and needles.
WATCH THIS HOW-TO VIDEO
1. KNOW WHAT "QUILTING" MEANS
Before you start quilting, it's helpful to know what it means. A quilt is basically a bunch of squares (or "blocks") of fabric all sewn together to make a big rectangular blanket. Each square is made individually, and then the finished squares are sewn together at the end. As a result, it's possible to keep making quilts larger and larger by adding squares (as we are constantly doing to the AIDS quilt).Each block has three layers that are stitched together. The outside layers are the pretty cloth that we look at, and the inside layer is padding (to make the quilt soft). Presently, quilt styles are separated broadly in two categories: 1) Traditional quilts; and 2) Contemporary or Art quilts.
Traditional quilts
Traditional quilts have styles that have been around since the days of covered wagons. Traditional quilt blocks are made up of pieces of cloth cut into different geometric shapes that end up fitting in a square. You can have different types of triangles, rectangles or small squares comprise a particular block design, or you can just have one big square. As long as it ends up square, you can do whatever floats your boat.
Contemporary/art quilts
Contemporary or art quilts take their name from a movement that started in the 1960s and 1970s when artists began to toy with the structure of the traditional quilt to turn it into an art form. For the purposes of this SYW, all you have to know is that contemporary quilts have intricate, difficult structures (not always blocks), and they have intricate, difficult stitching techniques. It's definitely not for the first-time quilter, but if you want to impress people, it's nice to know that they're out there. If you want to really impress people, toss around the names Nancy Crow and Michael James, two prominent quilt artists.
2. RECOGNIZE THE PARTS OF A QUILT
As we mentioned earlier, quilts have three basic components: the quilt top, the batting and the quilt back. Imagine a tuna sandwich:The bread that is on top of the sandwich is known as the quilt top. Quilt tops can have several different looks:
- Quilt tops can be made out of scraps of fabric, a procedure known as patchwork.
- Quilt tops can be made using a technique known as appliqué. Appliqué is a French term that refers to attaching smaller pieces of fabric on top of bigger pieces. Appliqués can range from flowers to people to anything else you can cut out.
Here are some examples made specifically for SoYouWanna.net. The heart on the left is patchwork, while the heart on the right is appliqu.
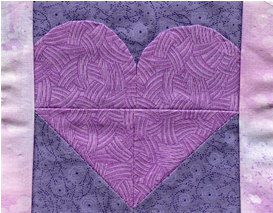
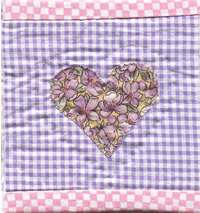 patchworkappliqu
 - Quilt tops can have both patchwork and appliqué elements mixed together.
- The tuna in the sandwich is called the batting, which can be cotton, wool, polyester or a blend. This is the cushy part inside a quilt that makes it fun to sleep on or wrap yourself in. For your quilt, you can use whatever you like, as long as you make sure that you're not allergic to it.
- The bread on the bottom of your tuna sandwich is called the quilt back. The quilt back is usually comprised of only one or two pieces of cloth (so it can be stable).
Don't forget the crust of your sandwich; in this analogy, it is called the binding. You make the binding of a quilt when you've finished attaching all of the blocks together and you want to hide the ugly rough edges of the quilt (or in this case, it helps tuck in the tuna so it doesn't spill over the edge).
3. GET THE PROPER EQUIPMENT
Before you spend money on supplies, you should first check to see if any of your friends (or their parents or grandparents) have any equipment you could borrow. But even if you have to buy all your stuff, it's still pretty cheap. However you get your equipment, it is vital that you get the right stuff because without it, you'll get frustrated. We don't want that on our conscience.
When you go to the fabric store, you should definitely tell the salesperson that you're a first-time quilter and that you need help. Bring this list with you, in case you get one of those evil quilt salespeople who tries to take advantage of you and sell you crap you don't need.
You will need:
- Fabric: The best 100% cotton fabric you can round up. Don't use fabric from T-shirts or sheets (what will you sleep on?). Cheap fabrics tend to have designs that bleed when washed or that stretch out over time, so you're safest going to a quilting store and getting material made specifically for quilting. The quality quilt fabric will probably cost around $6.00 to $8.00 a yard. After you buy your fabric, wash it by hand with a tiny bit of liquid laundry soap (NOT hand soap), don't pull on it too much, and let it dry on a hanger.
- Quilting thread: Assuming that you are quilting by hand, you need tough strong thread or the entire quilt will fall apart. It usually has a waxy covering to make life easier on your fingers.
- Pins: You'll need little sewing pins to keep everything in place while your stitching or your quilt will turn out deformed.
- Fabric scissors: The sharpest you can get your hands on.
- Needle: What are you going to stitch with? Your fingers?
- Marking pencils: You need to use these special pencils to draw on the fabric because the lead from normal #2 pencils won't erase.
- Batting: We recommend 100% cotton stuffing because it's the coziest. But you can use whatever you like.
The following can also be used, though are not absolutely necessary:
- Seam ripper: This is basically your "screw up" insurance. After you make a block, you might look at it and notice that you screwed things up. A seam ripper will very neatly unstitch your seams without destroying the entire block.
- Rotary cutter: This is a fabric-cutting tool that looks like a pizza cutter and is especially useful if you are interested in patchwork quilts.
- Self-healing mat: This handy matt has grids to help you align your fabric, and it prevents you from accidentally cutting through your kitchen table when you use a rotary cutter. We recommend the mats (and cutters) made by Olfa.
4. MAKE A PRACTICE BLOCK
You are going to need:
- 1 yard of one color for the quilt top and bottom, and ¼ yard of another fabric for the heart. It's a lot more fabric than you'll need, so feel free to mess up.
- All purpose thread in a color to match your fabric selection
- Your sharp scissors (don't run with them!)
- Pins
- A medium-sized piece of cardboard (a cereal box or file folder will be fine)
- A needle (any size is ok)
- A small piece of batting (a six-inch square will do)
- Quilting thread
- A fabric marking pencil or pen
Here's how to go about making your very first block:
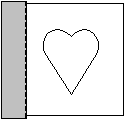
- Cut out a 6-inch square from your yard of fabric. This will be your quilt back. You can use your cardboard to make a template first and then you can trace around the cutout onto your fabric (with your fabric pen) and cut it out. Place the square to the side and ignore it.
- Cut out another 6-inch square This will be your quilt top. Again, feel free to use the cardboard as a template.

- From your ¼ yard of fabric for your heart, cut out 3-inch square and cut a little heart out of it.
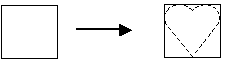
- Pin the heart shape to the center of your 6-inch square.
- Stitch around it.

- Cut a 7-inch square of batting.
- Now it's time to put your sandwich together: quilt top on top, batting in the middle, and quilt back on the bottom. Place a pin on each corner and one in the middle. Make sure the quilt sandwich is not moving (that is, the batting's not sliding around, and everything stays lined up nicely). The batting should be sticking out around all the sides.
- Make a knot at the end of your thread. Pull the thread through the quilt block (pulling the knot through too, so that the knot gets caught in the batting).
- Make even stitches that go through ALL three layers (make sure you catch the batting). Go all the way around the square.
- One you get back to the beginning, pull the thread so that you are on the quilt back, make a little knot, and you have a nice, neat quilt top.
- Trim the batting around the edge so that only ¼ inch sticks out.
5. BLIND YOUR BLOCK
Binding means that you are going to secure the edges of the block so that the batting doesn't fall out. Here's how to do it:- Cut several 2-inch thick strips of fabric that are just as long as your block.
- Using your fabric pen, mark a ¼-inch line down the edge of a strip.
- Pin the strip to an edge of the quilt top so that the strip is on the inside of the block, not hanging over the edge.

- Sew along the line all the way through the block.
- Flip the strip over the edge of the block (it'll double up over the bit you just sewed) to the quilt back.
- Pin and stitch the fabric to the quilt back.
- Repeat for the remaining three sides.
And you now have a legitimate quilt block. To make a quilt, you just stitch a bunch of these things together. As is the case with learning all new skills, it will take practice. You may want to invest in an economy-size box of Band-aids. But in the end, you can at least rest easy knowing that you've made a blanket that you created with your own little (needle-poked) fingers.